French croissants

In this famous and highly technical recipe from a piece of yeast-based flaky dough we are going to cut and shape ("roll") croissants.
Last modified on: June 26th 2019
Keywords for this recipe:For 10 croissants, you will need:
- 1
 750 g Yeast-based flaky dough (for croissants)
 - 2
 30 g beaten egg
 - Total weight: 780 grams
How long does it take?
Time required for this recipe:
| Preparation | Resting | Cooking | Start to finish |
|---|---|---|---|
| 44 min. | 1 hour 30 min. | 20 min. | 2 hours 34 min. |
At what time:
- When will I finish if I start the recipe at ... ?
When should I start for the recipe to be ready at ... ? - Work this out...
Step by step recipe
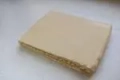
Stage 1 - 5 min.
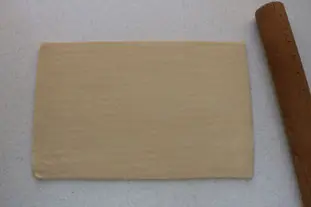
Roll out 750 g Yeast-based flaky dough (for croissants) really cold into a 10 inch (25 cm) wide strip.
The length will depend on the number of croissant you are going to make. Ideally, it should be 0.2 inch (4 mm) thick.
The length will depend on the number of croissant you are going to make. Ideally, it should be 0.2 inch (4 mm) thick.
Stage 2
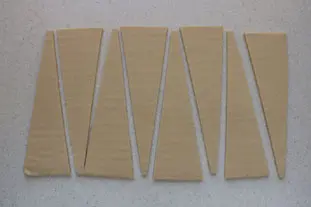
Cutting out
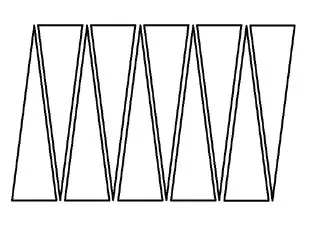
To make the croissants, you need to cut the dough strip across into elongated triangles with a base of 3 inches (8 cm).There are 2 ways of doing this: either isoceles triangles, as shown here...
Stage 3
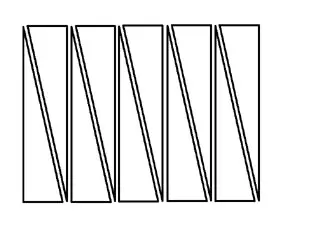
...or right-angle triangles as in this diagram.
Choose whichever method you prefer. The right-angle method is traditionally reckoned to be simpler.
Choose whichever method you prefer. The right-angle method is traditionally reckoned to be simpler.
Stage 4
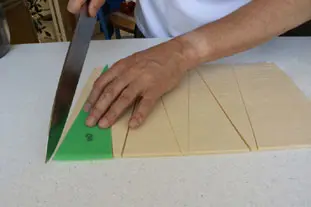
I've opted for the isoceles method, but I'm using a template, cut from plastic, to help me.
Stage 5 - 5 min.
Cut the whole strip of dough into triangles. Each triangle should ideally weigh 70 gr.
Note: as with any viennoiseries, cold is your friend. Whenever you feel the dough starting to soften too much, declare a "cooling pause", transfer your triangles onto a baking sheet and leave in the freezer for 15 minutes to firm up.
Note: as with any viennoiseries, cold is your friend. Whenever you feel the dough starting to soften too much, declare a "cooling pause", transfer your triangles onto a baking sheet and leave in the freezer for 15 minutes to firm up.
Stage 6 - 1 min.

There are 2 ways to shape the croissants:
1) "Straight", where the rolled-up croissants are not curved. This is the simpler method.
2) "Curved", where the finished croissants are crescent-shaped, and the dough is cut to achieve this curve. This is a trickier method.
If you wish to make curved croissants, make a 1 inch (2 cm) cut in the middle of the base edge of each triangle.
Stage 7
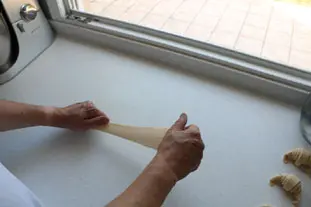
Shaping straight croissants
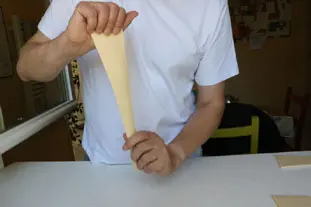
Take a triangle of dough and stretch gently lengthways several times. It should increase from 10 inches (25 cm) to about 14 inches(35 cm) long.
Stage 8
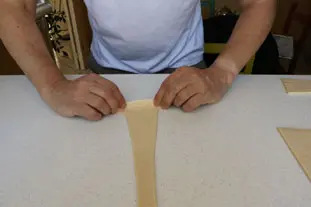
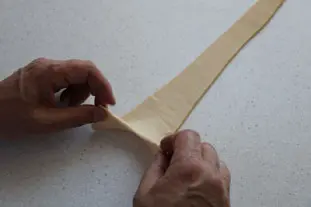
Lay this triangle on the worktop with the short base edge nearest you.
Stretch the two points of this edge gently outwards and begin rolling...
Stretch the two points of this edge gently outwards and begin rolling...
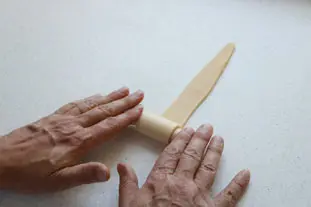
Stage 9

...towards the point...
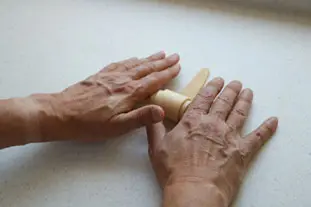
Stage 10
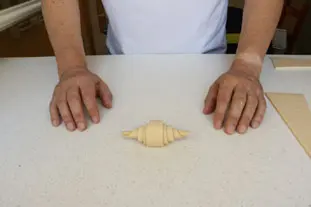
...until all the dough has been rolled up.
You have just made a straight croissant.
You have just made a straight croissant.
Stage 11
This short video shows how to roll up a straight croissant.
Stage 12
Shaping curved croissants
Take a triangle of dough with a cut in the base edge. Stretch gently lengthways several times until it increases from 10 inches (25 cm) to about 14 inches (35 cm) long.Stage 13
Lay the dough triangle on the worktop with the short base edge nearest you.
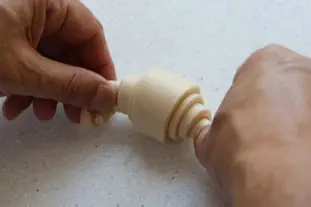
Stretch the two points of this edge outwards (don't worry if the dough begins to tear), making use of the cut to separate the two parts that will form the croissant's "horns". And start to roll...
Stretch the two points of this edge outwards (don't worry if the dough begins to tear), making use of the cut to separate the two parts that will form the croissant's "horns". And start to roll...
Stage 14
...towards the point...
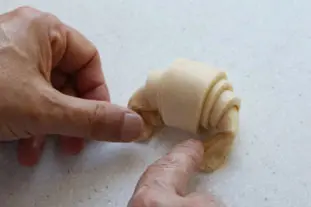
Stage 15
...until the dough is fully rolled up.
Stage 16
Take hold of the horns...
Stage 17
And bend these round inwards towards the front.
Fix them in shape by crushing the ends gently with your finger.
Fix them in shape by crushing the ends gently with your finger.
Stage 18
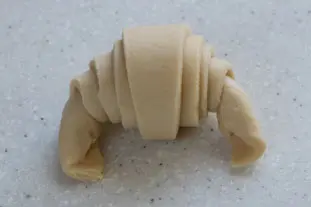
You have now made a curved croissant.
Stage 19
This short video shows how to roll up a curved croissant.
Stage 20 - 30 min.
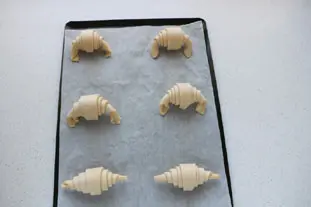
Roll up all the triangles like this and arrange on cooking parchment laid on a baking sheet.
Important: the croissants will swell up a lot during cooking, so leave plenty of space between them.
Important: the croissants will swell up a lot during cooking, so leave plenty of space between them.
Stage 21 - 1 hour 30 min.
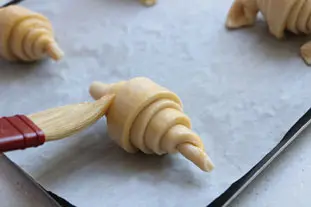
Glaze the croissants, then leave in a warm place to rise for one hour to an hour and a half.
Stage 22 - 3 min.
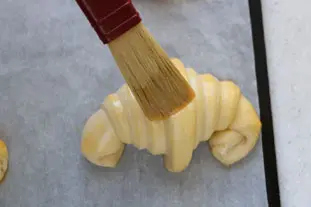
Preheat your oven to 390°F (200°C).
Glaze the croissants again.
Glaze the croissants again.
Stage 23 - 20 min.
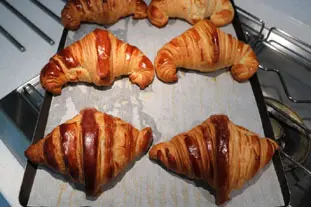
Bake for about 20-25 minutes.
Stage 24
Leave to cool, on a wire rack if possible, then enjoy!
Remarks
Nothing need go to waste: any leftover bits of dough can be used to make soured dough for the next time you make croissants. Weigh 100 g, wrap in plastic film (with a label) and freeze until needed.
Keeping
A few hours, no more.
Source
Based on a recipe by master baker Sébastien Ropers of the Pen ar bread bakery.
Nutritional information
| Whole recipe | |||
|---|---|---|---|
| Energetic value | Proteins | Carbohydrates | Fats |
| 3,185 Kcal or 13,335 Kj | 57 gr | 330 gr | 185 gr |
| 159 % | 22 % | 31 % | 28 % |
| Per 100 g | |||
|---|---|---|---|
| Energetic value | Proteins | Carbohydrates | Fats |
| 408 Kcal or 1,708 Kj | 7 gr | 42 gr | 24 gr |
| 20 % | 3 % | 4 % | 4 % |
| Per croissants | |||
|---|---|---|---|
| Energetic value | Proteins | Carbohydrates | Fats |
| 319 Kcal or 1,336 Kj | 6 gr | 33 gr | 18 gr |
| 16 % | 2 % | 3 % | 3 % |
How much will it cost?
- For 10 croissants : 2.53 €
- Per croissants : 0.25 €
Note: Be careful, these prices are only an estimate, you can consult the table of prices by ingredients used for this estimate.
This recipe uses (among others)
 | Yeast-based flaky dough (for croissants): You can get more informations, or check-out other recipes which use it, for example: Mirlitons of Guipavas, Baker's apple soles, Croissant dough apples, Pistachio and goji pinwheels, Raisin breads (pains aux raisins), ... All |
 | Beaten egg: You can get more informations, or check-out other recipes which use it, for example: Apple and Blackcurrant Brioche Pies, Nanterre brioche, Apple Strudel, Gisèle's Pasties, Olive twists, ... All |
Other recipes you may also like
Natural leaven
Leaven is a natural raising agent, a fermented mixture of water, flour and the microscopic yeasts which are present in the air. It's a delicate living substance, sensitive to the external environment. The recipe is around 4000 years old and dates back to the Egypt of the Pharaohs, via a beautiful...1.7M 304.0 7 days 15 min. April 3rd 2020
Passion fruit jellies
Usually to make fruit jellies or (fruit "paste"), it's like jam but you need to cook fruit pulp and sugar much longer. Unfortunately, this long cooking is bad for both vitamins and flavour. In this recipe we use a special jam gelling agent, to reduce cooking time as much as possible .321K4 2 hours 30 min. July 4th 2018

Blanquette of veal
Blanquette is a classic dish of French family cooking, but can also be found in bistros. Veal is cooked slowly, and the sauce is thickened with a mixture of egg yolks and cream. I have set out a rather special way of making it.405K4.4 2 hours 49 min. February 5th 2015
4 pears salad with vanilla
It's a very easy recipe, everything depends on the choice of differents kinds of pears all fully ripe, to give a delicious contrast in the mouth.217K4.2 37 min. February 21th 2011

Confectioner's custard (Crème pâtissière, or French pastry cream)
Quite similar to crème anglaise but much thicker. It is used in many pastries like choux pastry (pâte à choux) or millefeuille.735K 313.7 36 min. January 27th 2017
News list of cooking-ez.com
Sign up to receive the latest recipes (next batch due to be sent on 2024-05-12)
Note: We'll never share your e-mail address with anyone else.
Post your comment or question
Your 2 comments or questions on this recipe
- No, unfortunately in that case syrup does not work (at all), you should use beaten eggs.Posted by yes may 17th 2020 at 14:40 (n° 2)
- Sometimes croissants have a caramelized layer. Would you get that layer by "glazing" with sugar syrup instead of yolk?Posted by hmijail may 17th 2020 at 06:01 (n° 1)
Follow this recipe (as 13 people already do)
If you are interested in this recipe, you can "follow" it, by entering your email address here. You will then receive a notification immediately each time the recipe is modified or a new comment is added. Please note that you will need to confirm this following.
Note: We'll never share your e-mail address with anyone else.
Alternatively: you can subscribe to the mailing list of cooling-ez.com , you will receive a e-mail for each new recipe published on the site.